How to Create Travel Itinerary for Visa in 6 Easy Steps (Free PDF Guide)

Creating a travel itinerary for visa application is an important step for many embassies. Instead of booking a real flight ticket, you can generate a professional travel itinerary using an online tool.
In this guide, we will show you step by step how to create a travel itinerary for visa using a free online generator.
WHAT IS TRAVEL ITINERARY
A travel itinerary is a document that shows your travel plan, including flight details, dates, and destinations. It is commonly required when applying for a visa.
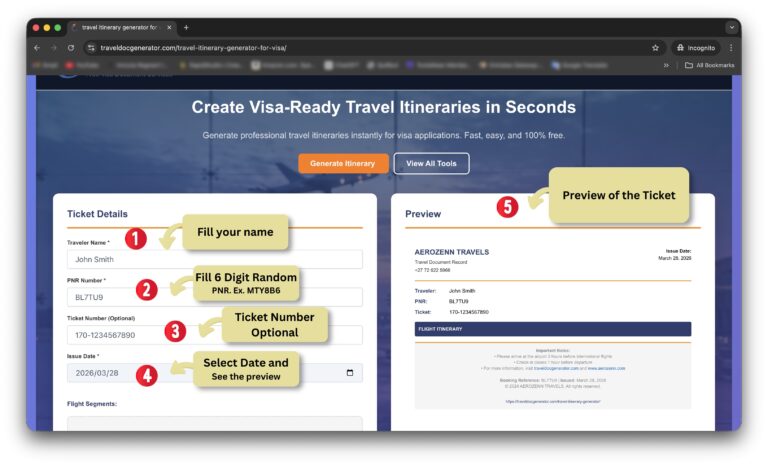
🧾 Step 1: Enter Traveler Details
First, enter the traveler information in the tool:
- – Traveler Name: Enter your full name (Example: John Smith)
- – PNR Number: You can enter any 6 digits random code (Example: ABC123 or XYZ789)
- – Ticket Number (Optional): You can leave it empty or add a sample number (Example: 1234567890)
- – Issue Date: You can select today’s date, past date, or future date depending on your requirement
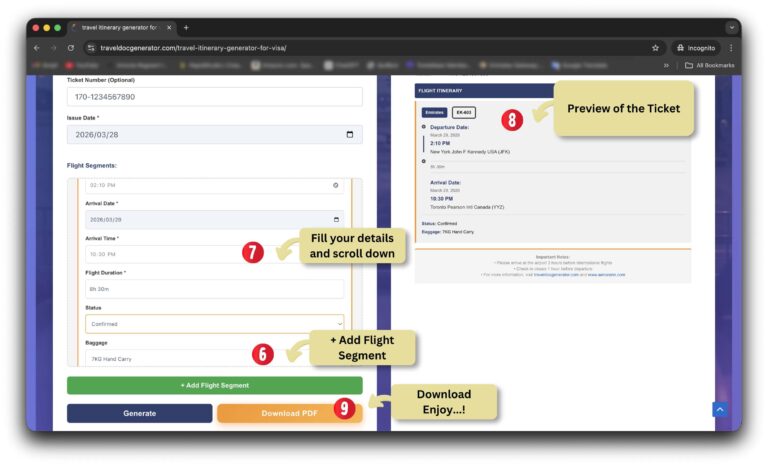
✈️ Step 2: Add Flight Segments
Click on “+ Add Flight Segment” to start adding your flight details.
Each segment represents one flight journey.
✈️ Step 3: Fill Flight Details
Now enter the flight information:
- – Departure Date
- – From (City/Airport)
- – To (Destination)
- – Airline Name (Example: Emirates, Qatar Airways)
- – Flight Number (Example: EK202, QR145)
- – Departure Time
- – Arrival Date and Time
- – Flight Duration (Example: 8h 30m)
- – Status (Confirmed)
- – Baggage (Example: 7KG Hand Carry)
🌍 Example:
From: New York (JFK)
To: Toronto (YYZ)
Airline: Air Canada
Flight Number: AC123
🔁 Step 4: Add Multiple Segments
You can add multiple flight segments based on your travel plan.
For example:
– Segment 1: New York → Toronto
– Segment 2: Toronto → London (Transit)
– Segment 3: London → New York (Return)
Click “+ Add Flight Segment” to add more journeys.
👀 Step 5: Preview Your Itinerary
As you enter details, the preview section will automatically update and show your complete travel itinerary.
📄 Step 6: Download PDF
Once everything is ready, click on “Download PDF” to get your professional travel itinerary.
You can use this document for visa applications.
⚠️ IMPORTANT TIPS
– Do not book real tickets before visa approval
– Always double-check your details
– Use realistic airline and route information
FAQs
Q: What is travel itinerary for visa?
A: It is a document showing your travel plan including flights and dates.
Q: Can I use this itinerary for visa?
A: Yes, it is formatted for visa applications.
Q: Do I need real ticket?
A: No, dummy itinerary is enough.
🔚 CONCLUSION
Creating a travel itinerary for visa is simple with the right tool. You can generate a professional document within seconds without any cost.
Additional Tips for Travel Itinerary for Visa
When creating a travel itinerary for visa, always make sure your information looks realistic and professional. Many embassies carefully review your travel plan, so adding proper flight details, correct dates, and a logical travel route is very important.
Using a travel itinerary generator for visa saves time and helps you avoid mistakes. Instead of formatting documents manually, you can generate a clean and structured itinerary instantly.
This is especially helpful for applicants who are applying for Schengen visa, UK visa, USA visa, or any other international visa.
Always double-check your itinerary before downloading the PDF to ensure all details are correct. A well-prepared travel itinerary for visa increases your chances of approval and makes your application look professional.
For official visa requirements, you can check embassy guidelines on official websites like https://www.vfsglobal.com